
“Snowstorm expected. If you’re English, stay inside and wait for the all-clear. If you’re Scottish, you’ll need your Big Coat.”
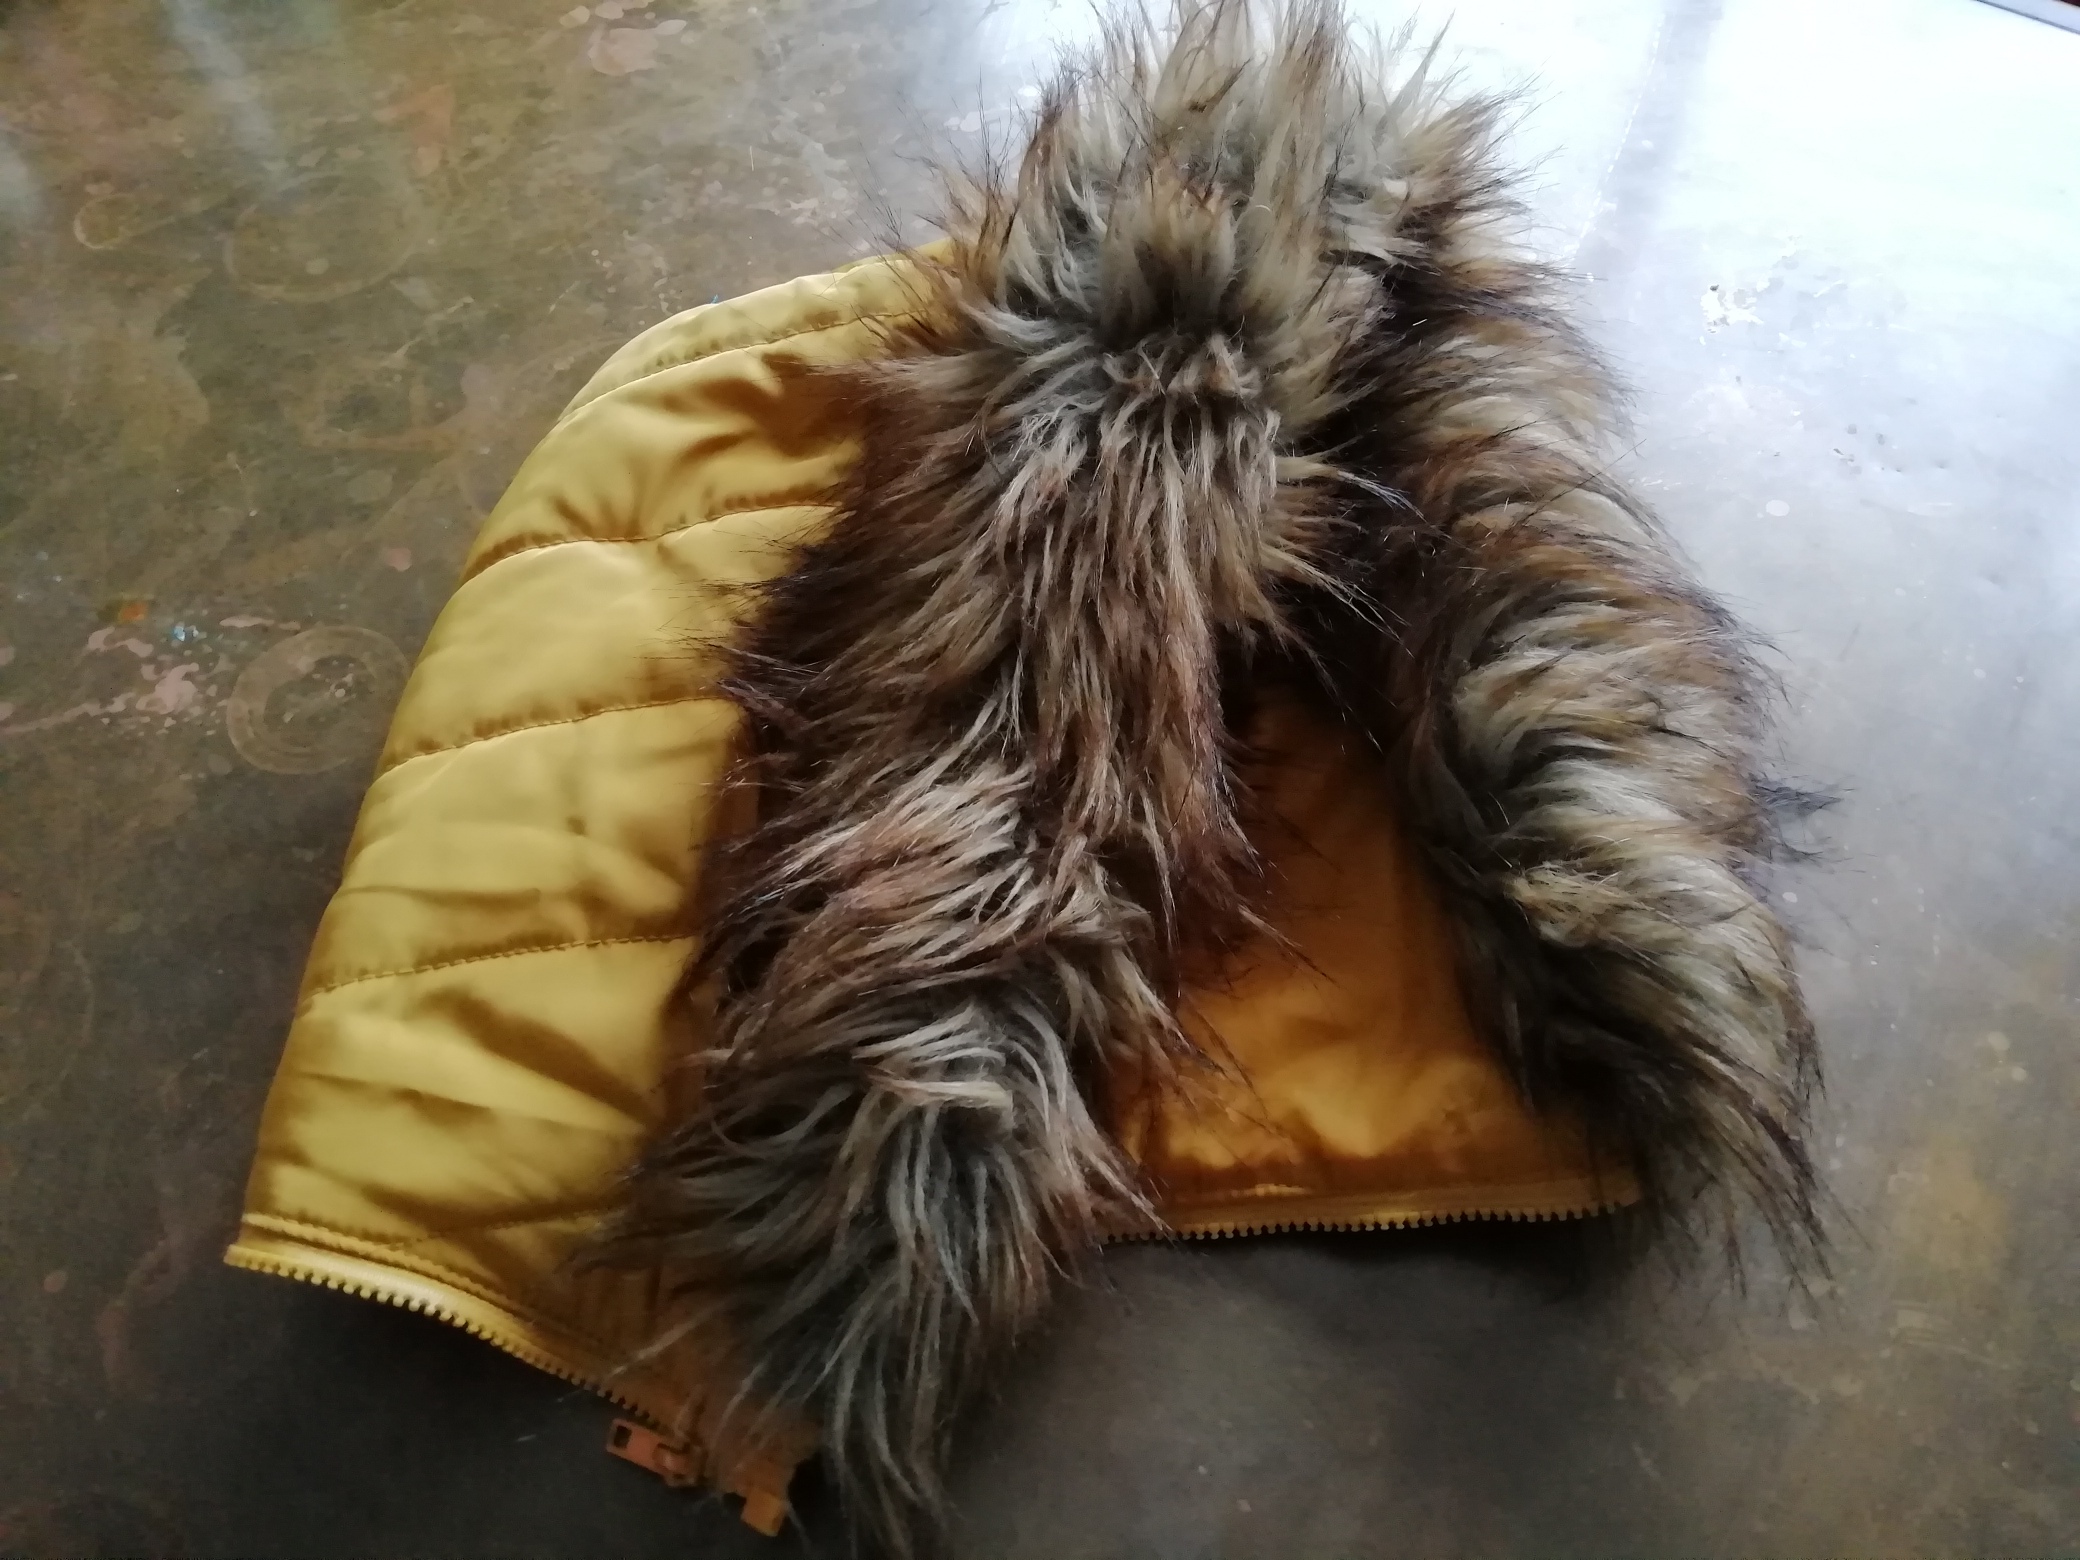
This is the hood that came with my Big Coat. The coat itself is perfect, but the hood is decorative. Decorative! I ask you!
Some designer actually thought, yeah, let’s put a hood on a winter coat that looks great, but you can’t actually tighten it around your head to keep the snow out or even to keep it on your head. People will love that!
Maybe in California, where you need a winter coat a few times a year, maybe, and a hood just messes up your hair. But in Scotland? Where bad weather is a thing?
Please.
This hood is wonderfully made from water resistant quilted nylon and high-quality synthetic fur. It’s warm and fuzzy and fits my head perfectly. It would be exactly the right thing if it would actually stay put.
But that is not the case.
Skip the Chat and Go Right to the Directions
How Long I’ve Had It
I bought my Big Coat at a Super Tesco about four years ago. Many British grocery stores have an impressive clothing section, and the buyers for those clothing sections totally get me. I love this coat and have worn it daily for four winters.
But the hood? It has to go.
Why I Like It
It’s padded and warm and ringed with really decent fake fur. The nylon is water-resistant, and this hood is toasty warm.
As long as I use one hand to hold it on my head.
Why I Don’t Wear It
It will not stay on my head. There is no drawstring, chinstrap, snaps, or any other sort of mechanism for securing it. Despite its top notch construction, it is not made to be worn.
It’s like a butterfly that’s stuck in its chrysalis. Such beauty! Such utility! Such wasted potential!
It makes me sad.
The Challenge
I want to turn this Stupid Unusable Decorative Hood into a working hood fit for a Scottish winter. Also, I want to do it in a way that’s attractive. It would be easy to make an ugly brute-force job of it, but I don’t want that.
My Tools
Here’s what I used.
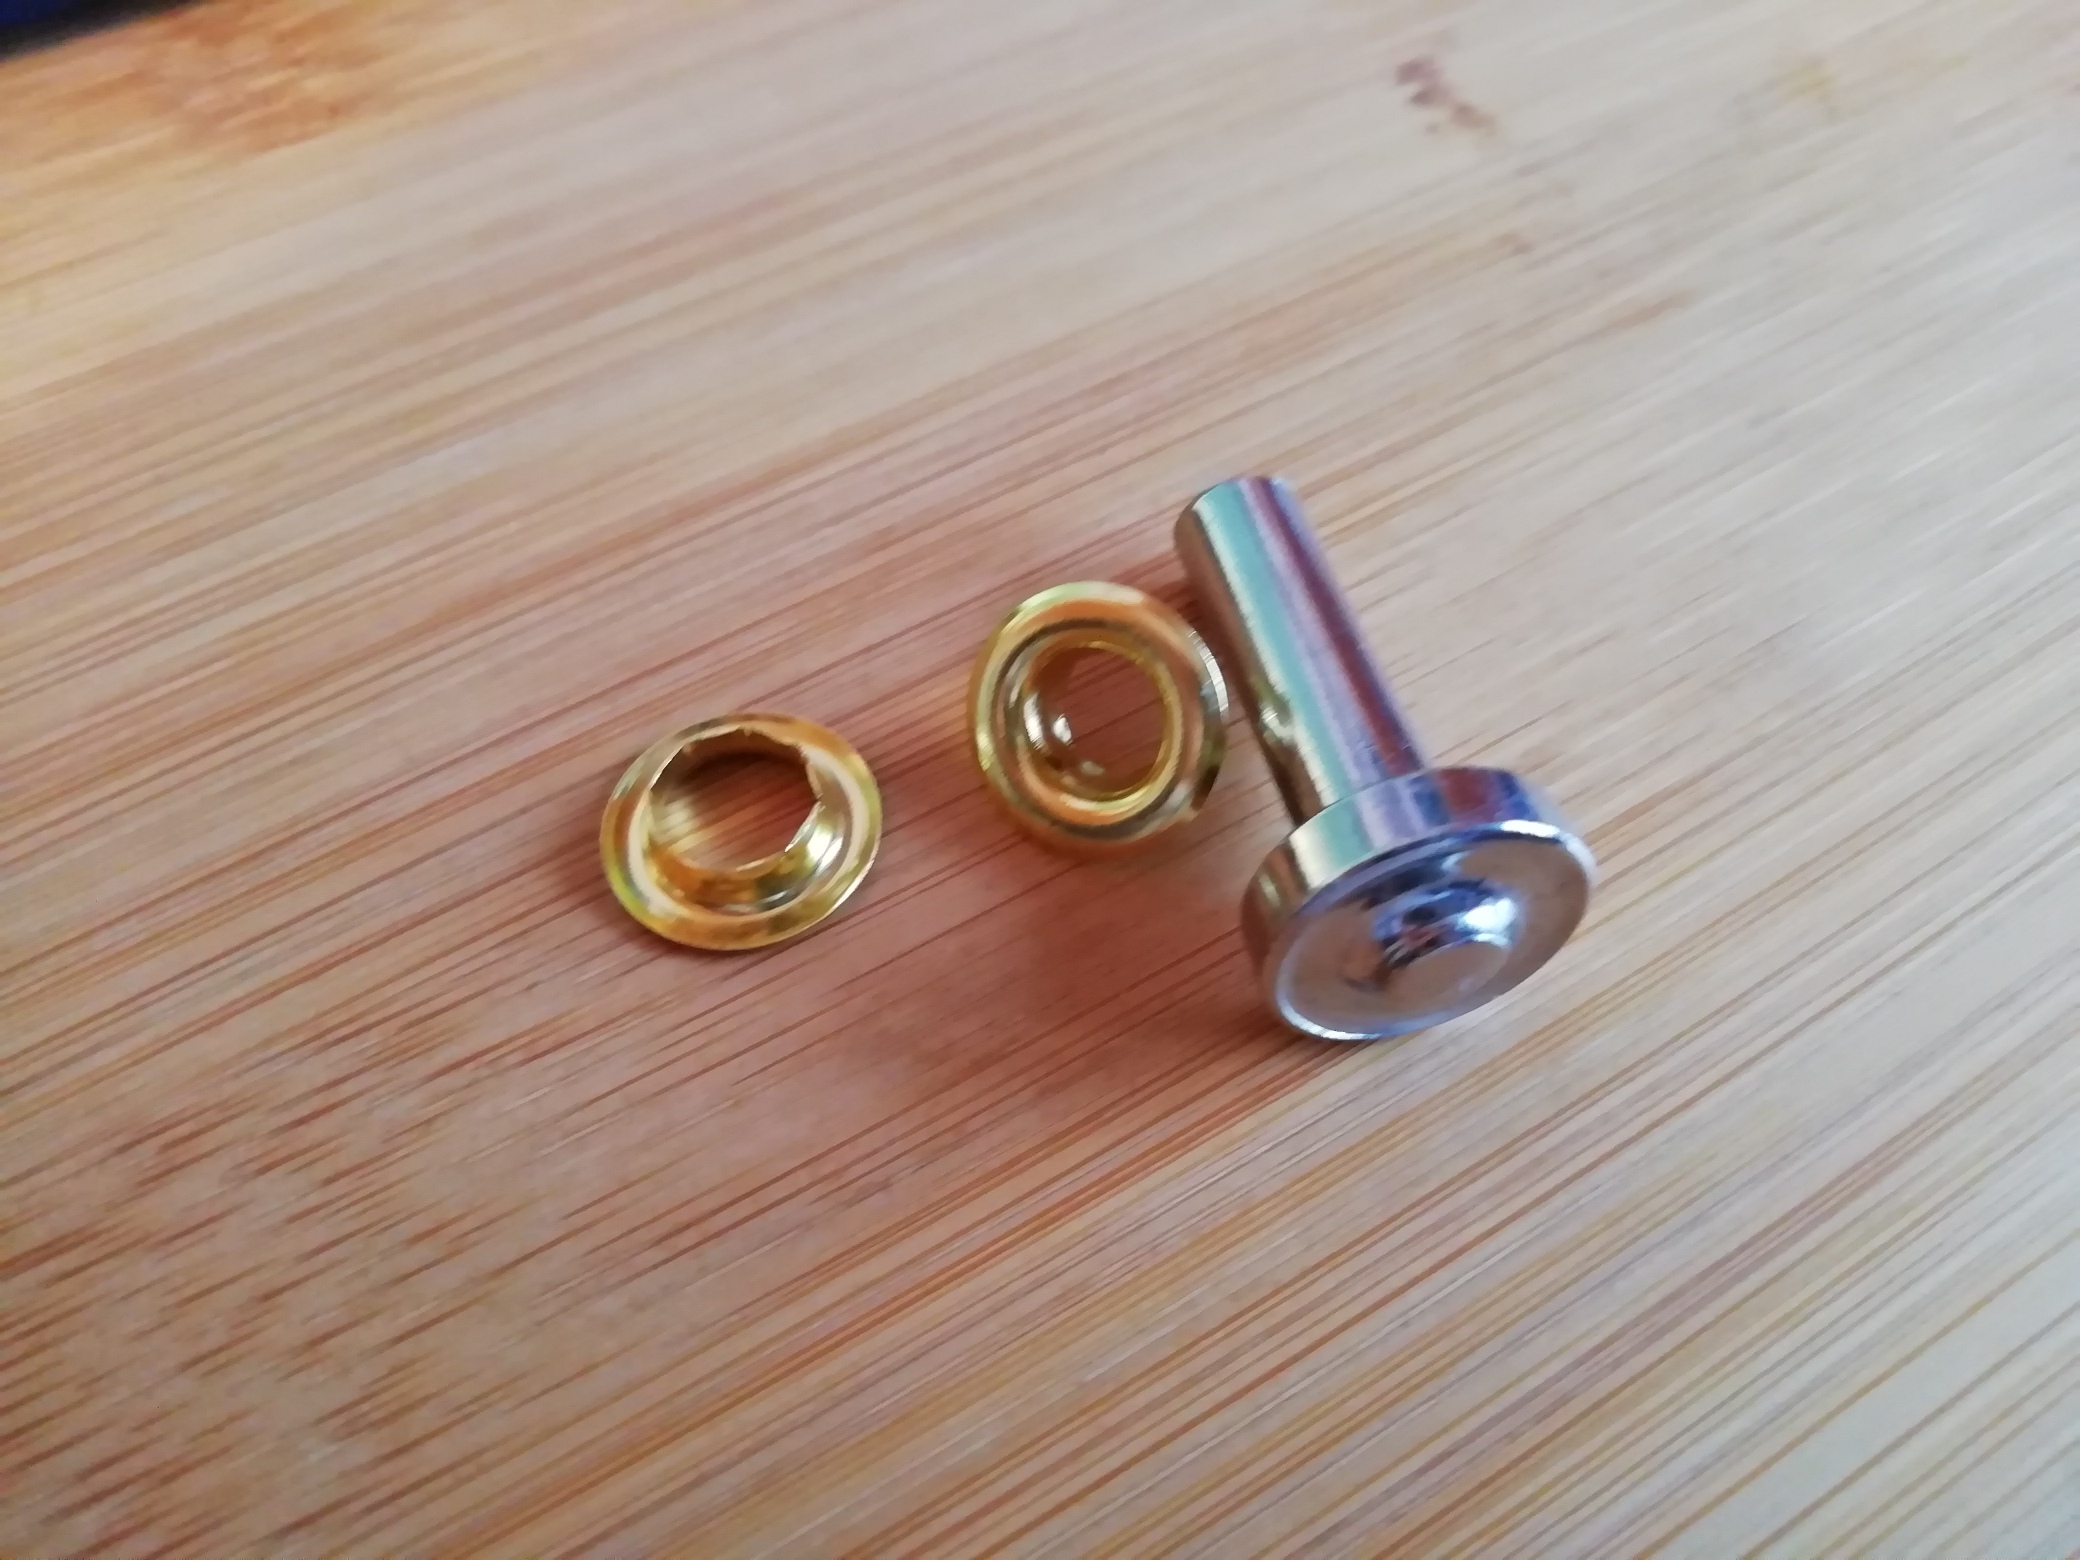
Eyelets and Eyelet Accessories
There are two kinds of people in the world. As often as not, they marry each other.
To wit: I’m the kind that never throws anything away. The man to whom I’ve plighted my troth, on the other hand, has no compunction about binning perfectly good items for which he has ceased to see a use.
The latter, admittedly, leads to a wonderfully tidy house.
But if you find yourself in the middle of Scotland, suddenly in desperate need of an eyelet setter, nonessential businesses are closed and it’s been snowing for three days, who you gonna call?
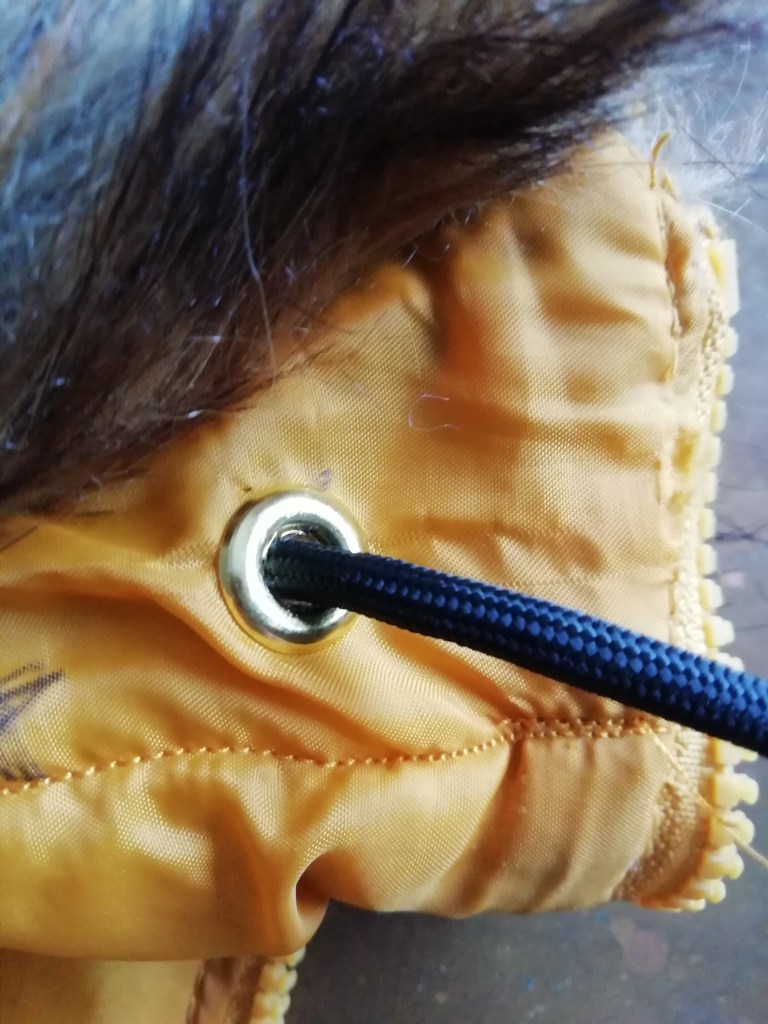
Eyelets (or grommets) are little metal rings that come in two parts. They’re used to reinforce holes in fabric or leather. You may recognize them from your favourite pair of shoes.
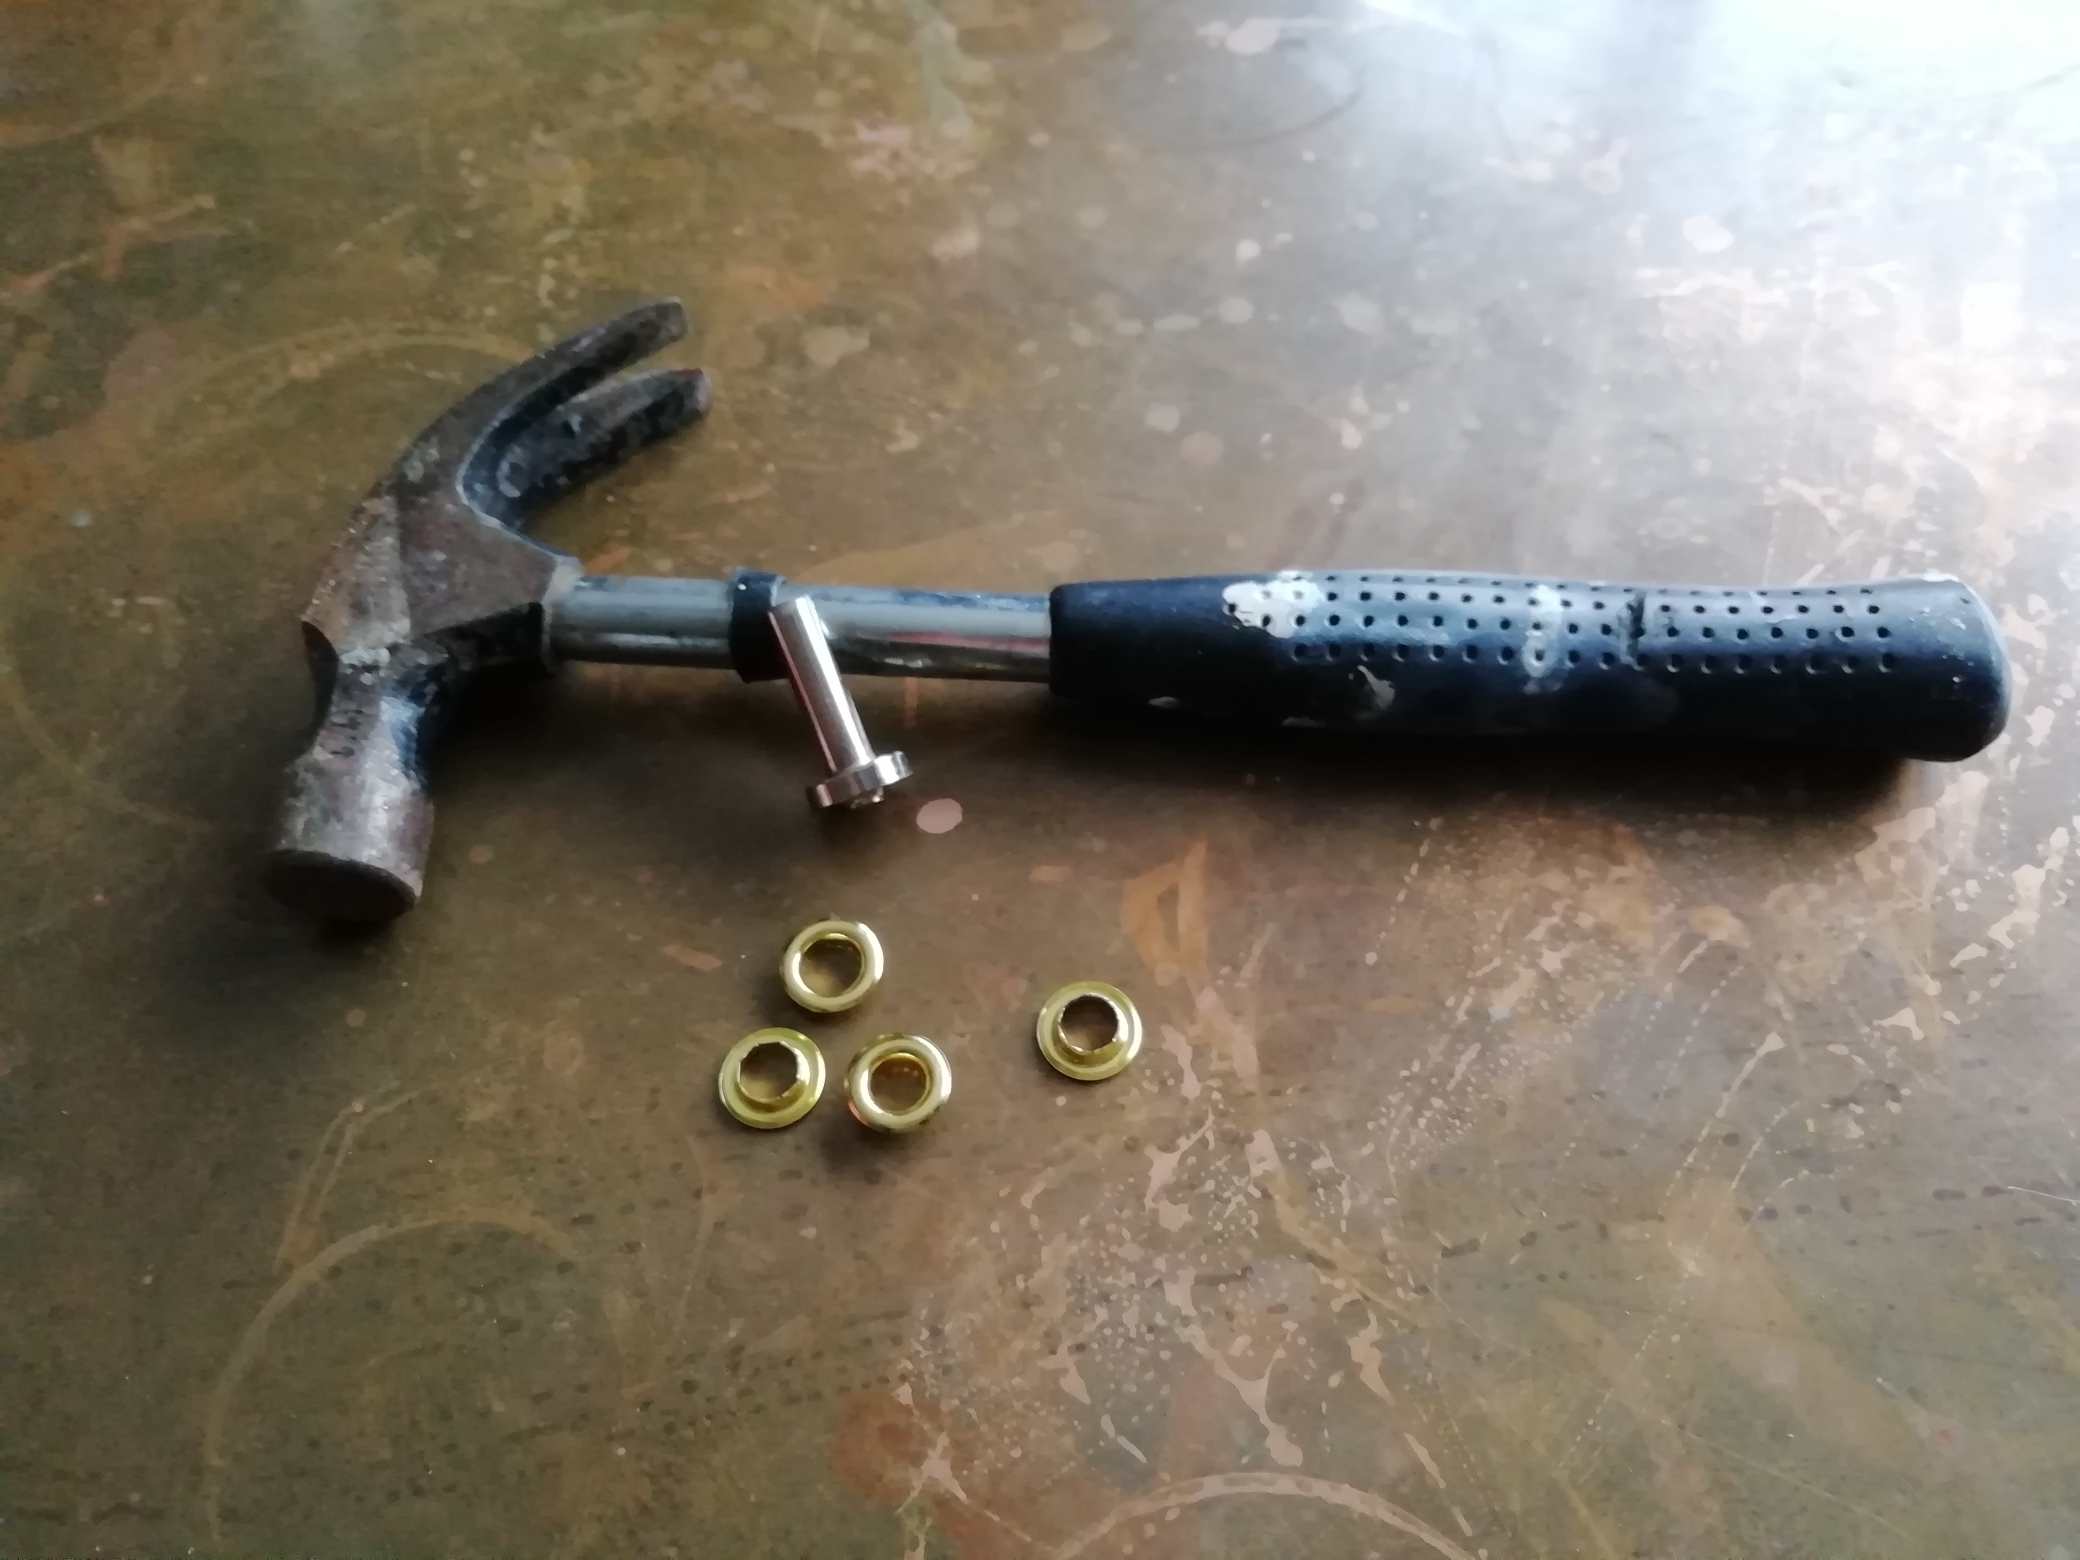
You’ll also need an eyelet setter and a light hammer.
So why do I have eyelets and an eyelet tool hanging about?
Years ago, I had a little business called Faraday Bags. I designed and made handbags with a Faraday cage inside. Eyelets were a fun and fashionable way to attach different bits to the main part of the handbag. I used them a lot.
I don’t make handbags anymore, but neither do I throw anything away. As I tore through the garage this morning looking for eyelets and an eyelet setter, I worried that they might have fallen victim to my generosity.
Before moving to Scotland, I invited a few friends over to help themselves to the fabrics and notions that I wasn’t taking with me because I foolishly thought that these things would be as cheap and easy to find in Scotland as they had been in Los Angeles.
Spoiler: they’re really, really, not.
But I did find them, and my little hammer, too. And also quite a few other bits and bobs like this refrigerator magnet advertising my first novel.
Another spoiler: our Scottish fridge would be a great size for a dorm room or camper, and the door is not magnetic.
Drawstring
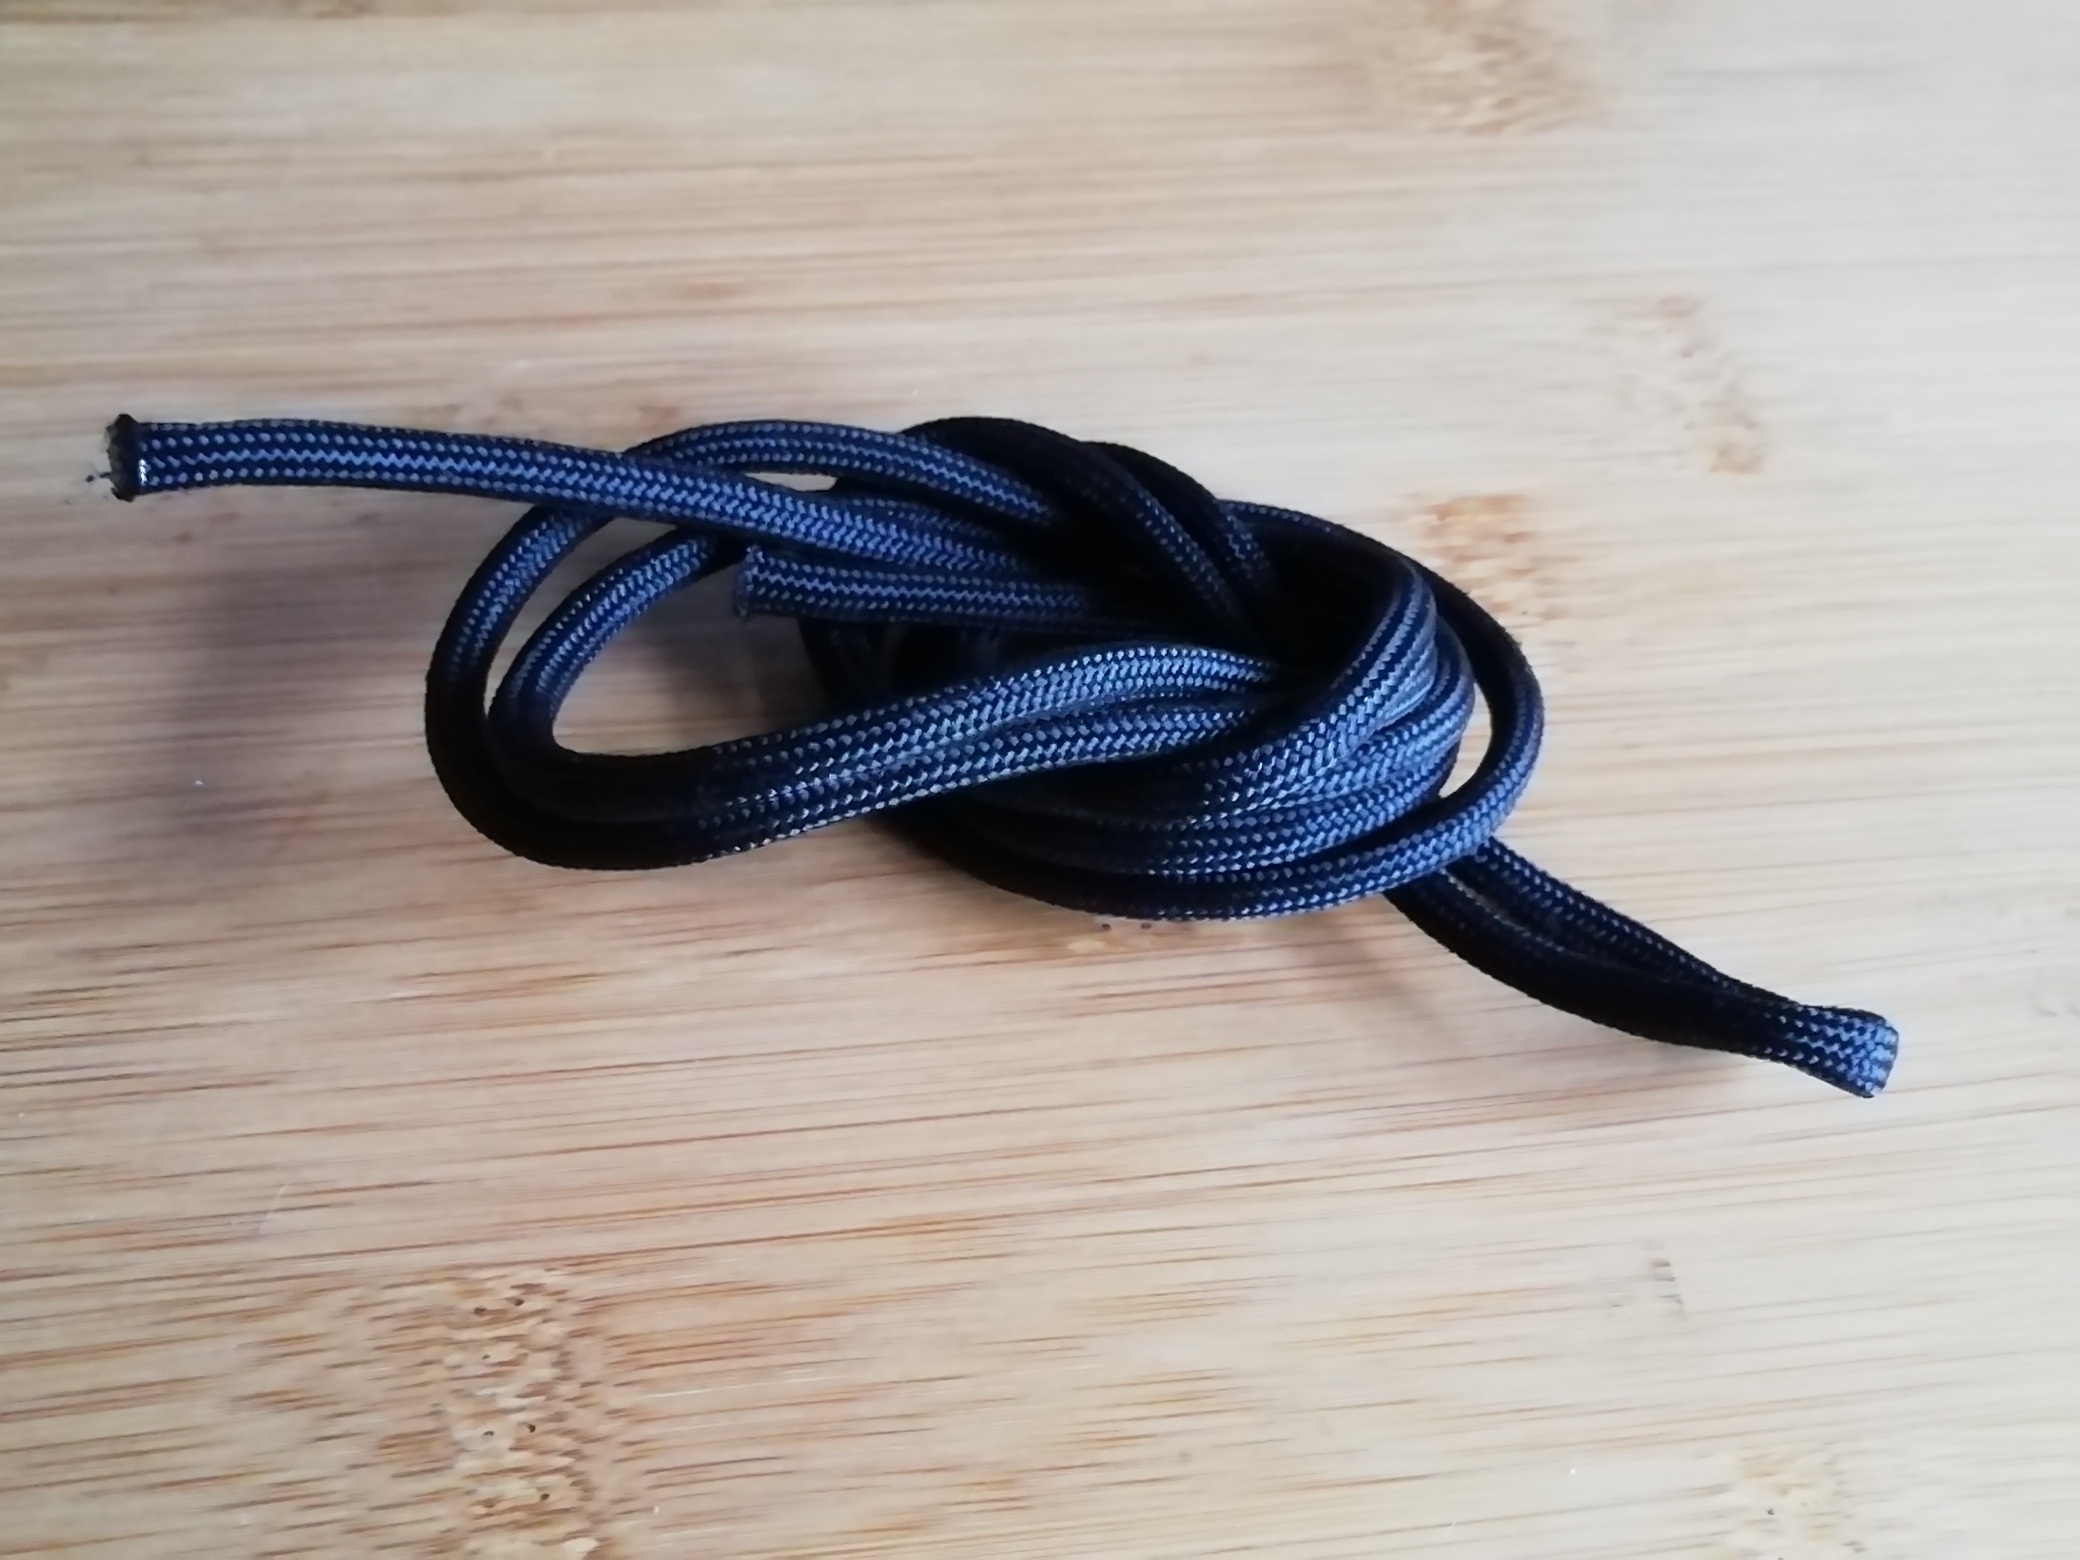
Do you remember that six months or so where everyone was making paracord survival bracelets? Faraday Bags remembers, too. And Past Me thoughtfully did not bin the miles of paracord I bought to make bracelets that I never ended up selling.
So now if I get lost in the woods while wearing my newly useful hood, I can take the drawstring out and make myself a fishing net.
Sewing Machine
Because this is a topstitching job, I used my regular sewing machine. You could also do this job sewing by hand.
Fabric Pen, Pen, or Tailor Chalk
Use this to mark where you’ll put your eyelets. You can also use it to trace your stitching line if you like.
Seam Ripper
If you need to unpick stitches at any point, a seam ripper or razor blade can be your best friend.
Decorative Hood Reincarnation: Step By Step
So, here’s what I did. It was pretty easy and took a little less than an hour. Best of all, though, my winter coat now has a hood that’s both fashionable and functional.
So, how did I do it?
Step 1: Mark Your Holes
I first put the hood on separately from the jacket, and made marks where I thought the holes should go. Fortunately, I thought to re-attach the hood and double-check, because my first marks weren’t in the right place at all. I made a second set of marks with the hood attached, and those turned out to be perfect.
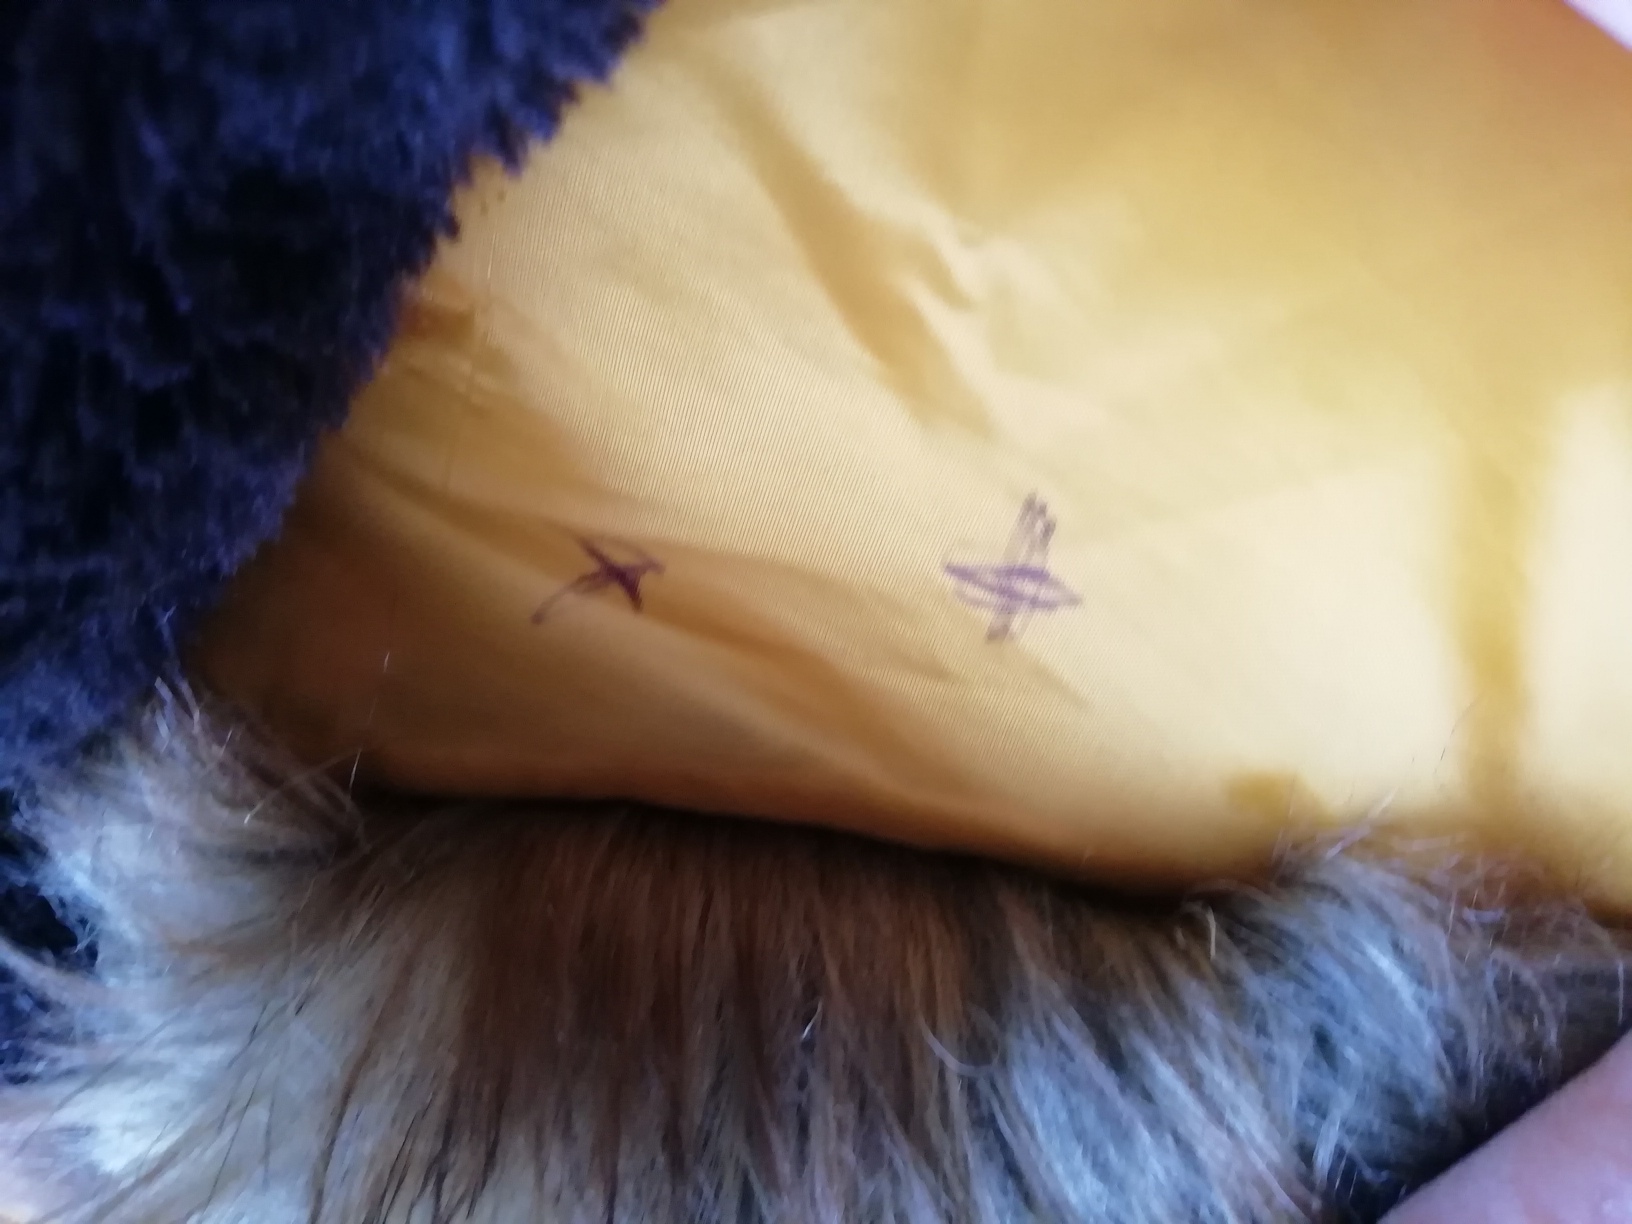
Protip: Don’t be like me. Measure with the hood in the finished position and use tailor chalk to mark your holes.
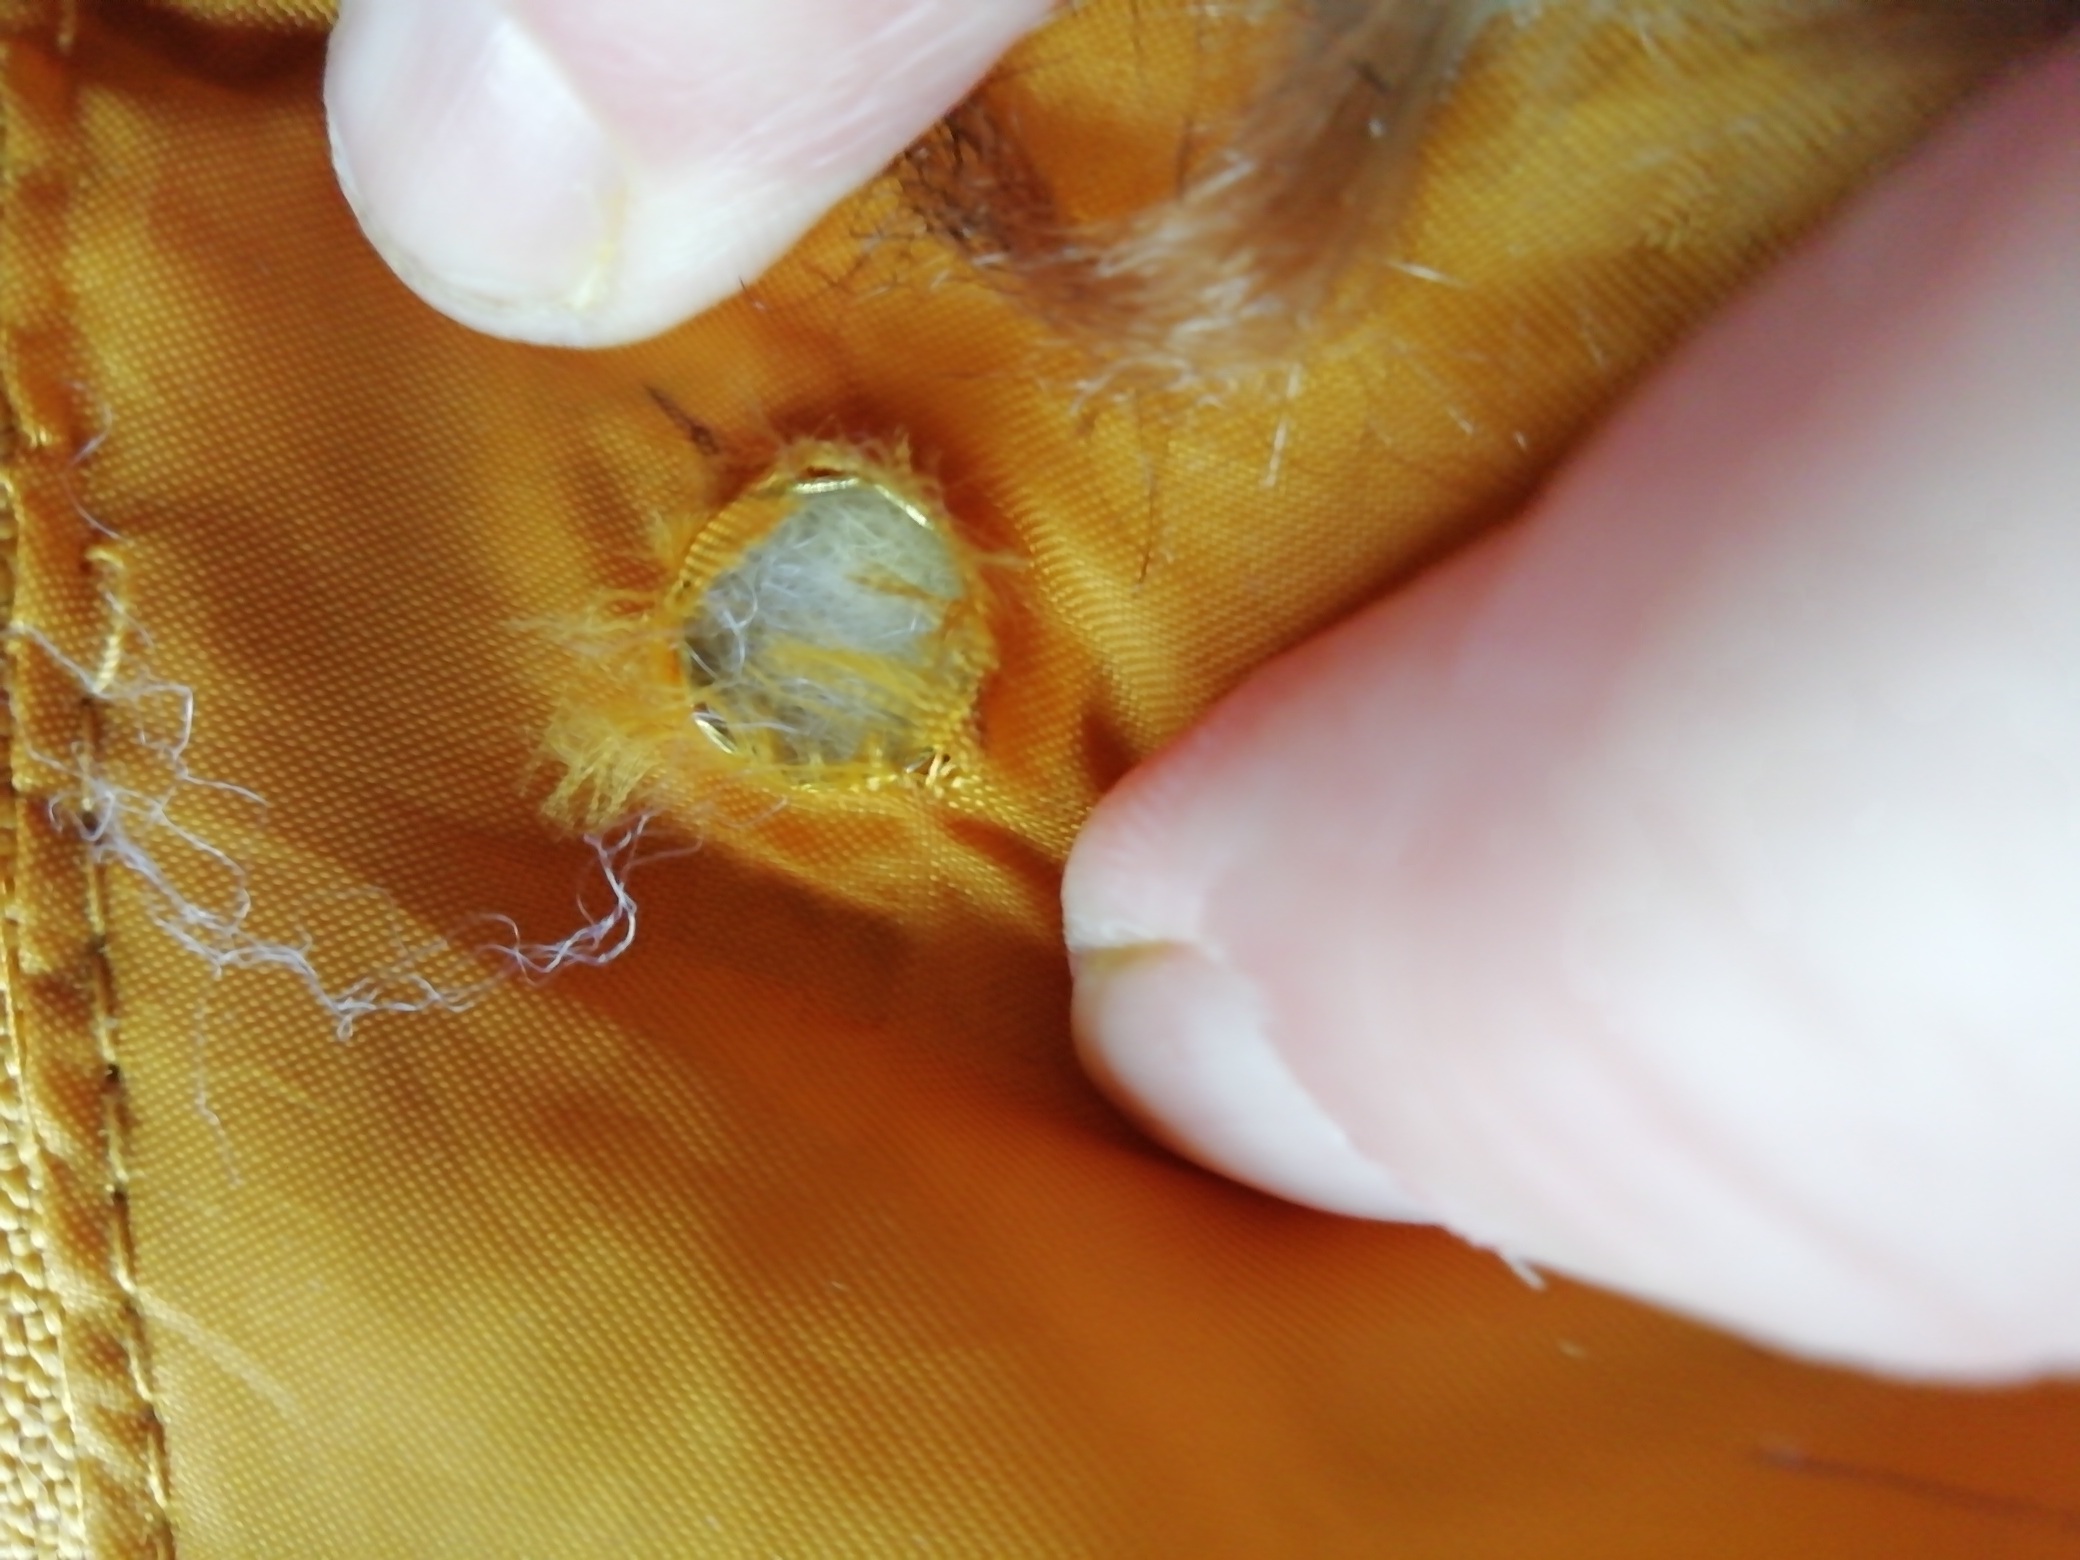
Step 2: Make The Holes
I used my seam ripper to gently and carefully make small holes over each of the marks. I also unpicked a few stitches to one side so that I could insert the eyelet.
Important! You’ll only be making the hole in the first layer of fabric.

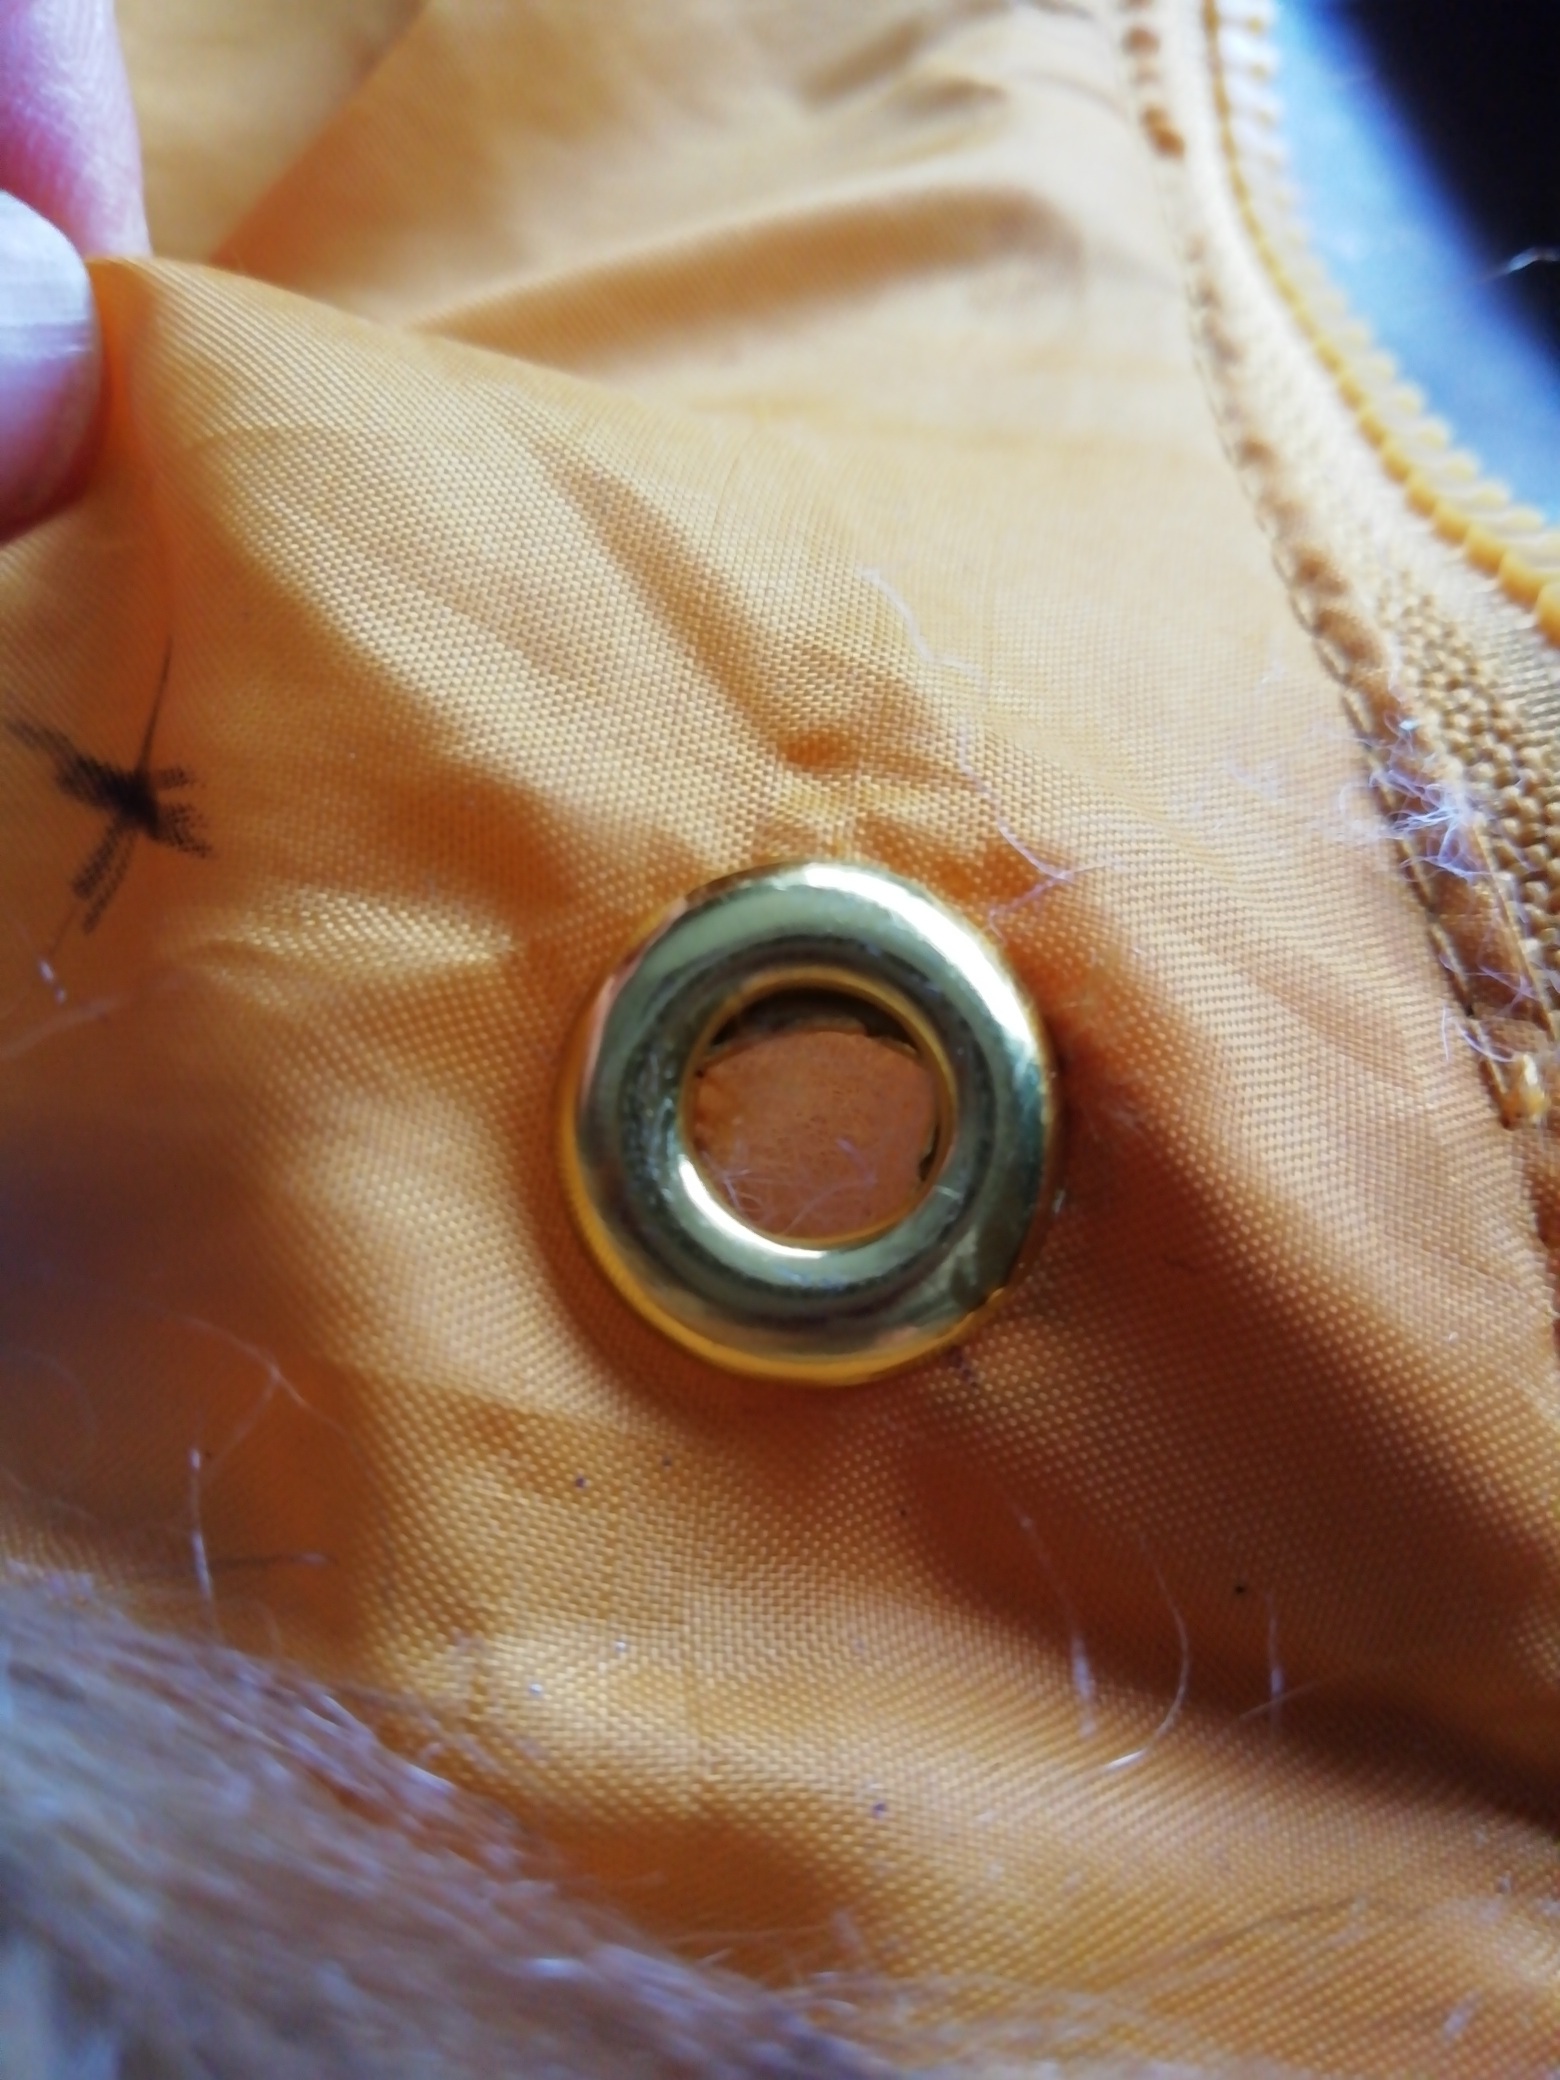
Step 3: Insert the First Half of the Eyelet
Now, slide the first half of the eyelet beneath the top layer of fabric. Bring the prongs up through the hole. Functionally, it doesn’t matter which half of the eyelet goes here. But I think it’s more attractive to have the taller-pronged half on the bottom.
Step 4: Insert the Second Half of the Eyelet
Now, place the second half of the eyelet on top of the first, sandwiching the fabric between them.
Step 5: Position Your Eyelet Tool
An eyelet tool looks simple, but positioning is important. Try to centre your tool within the hole.
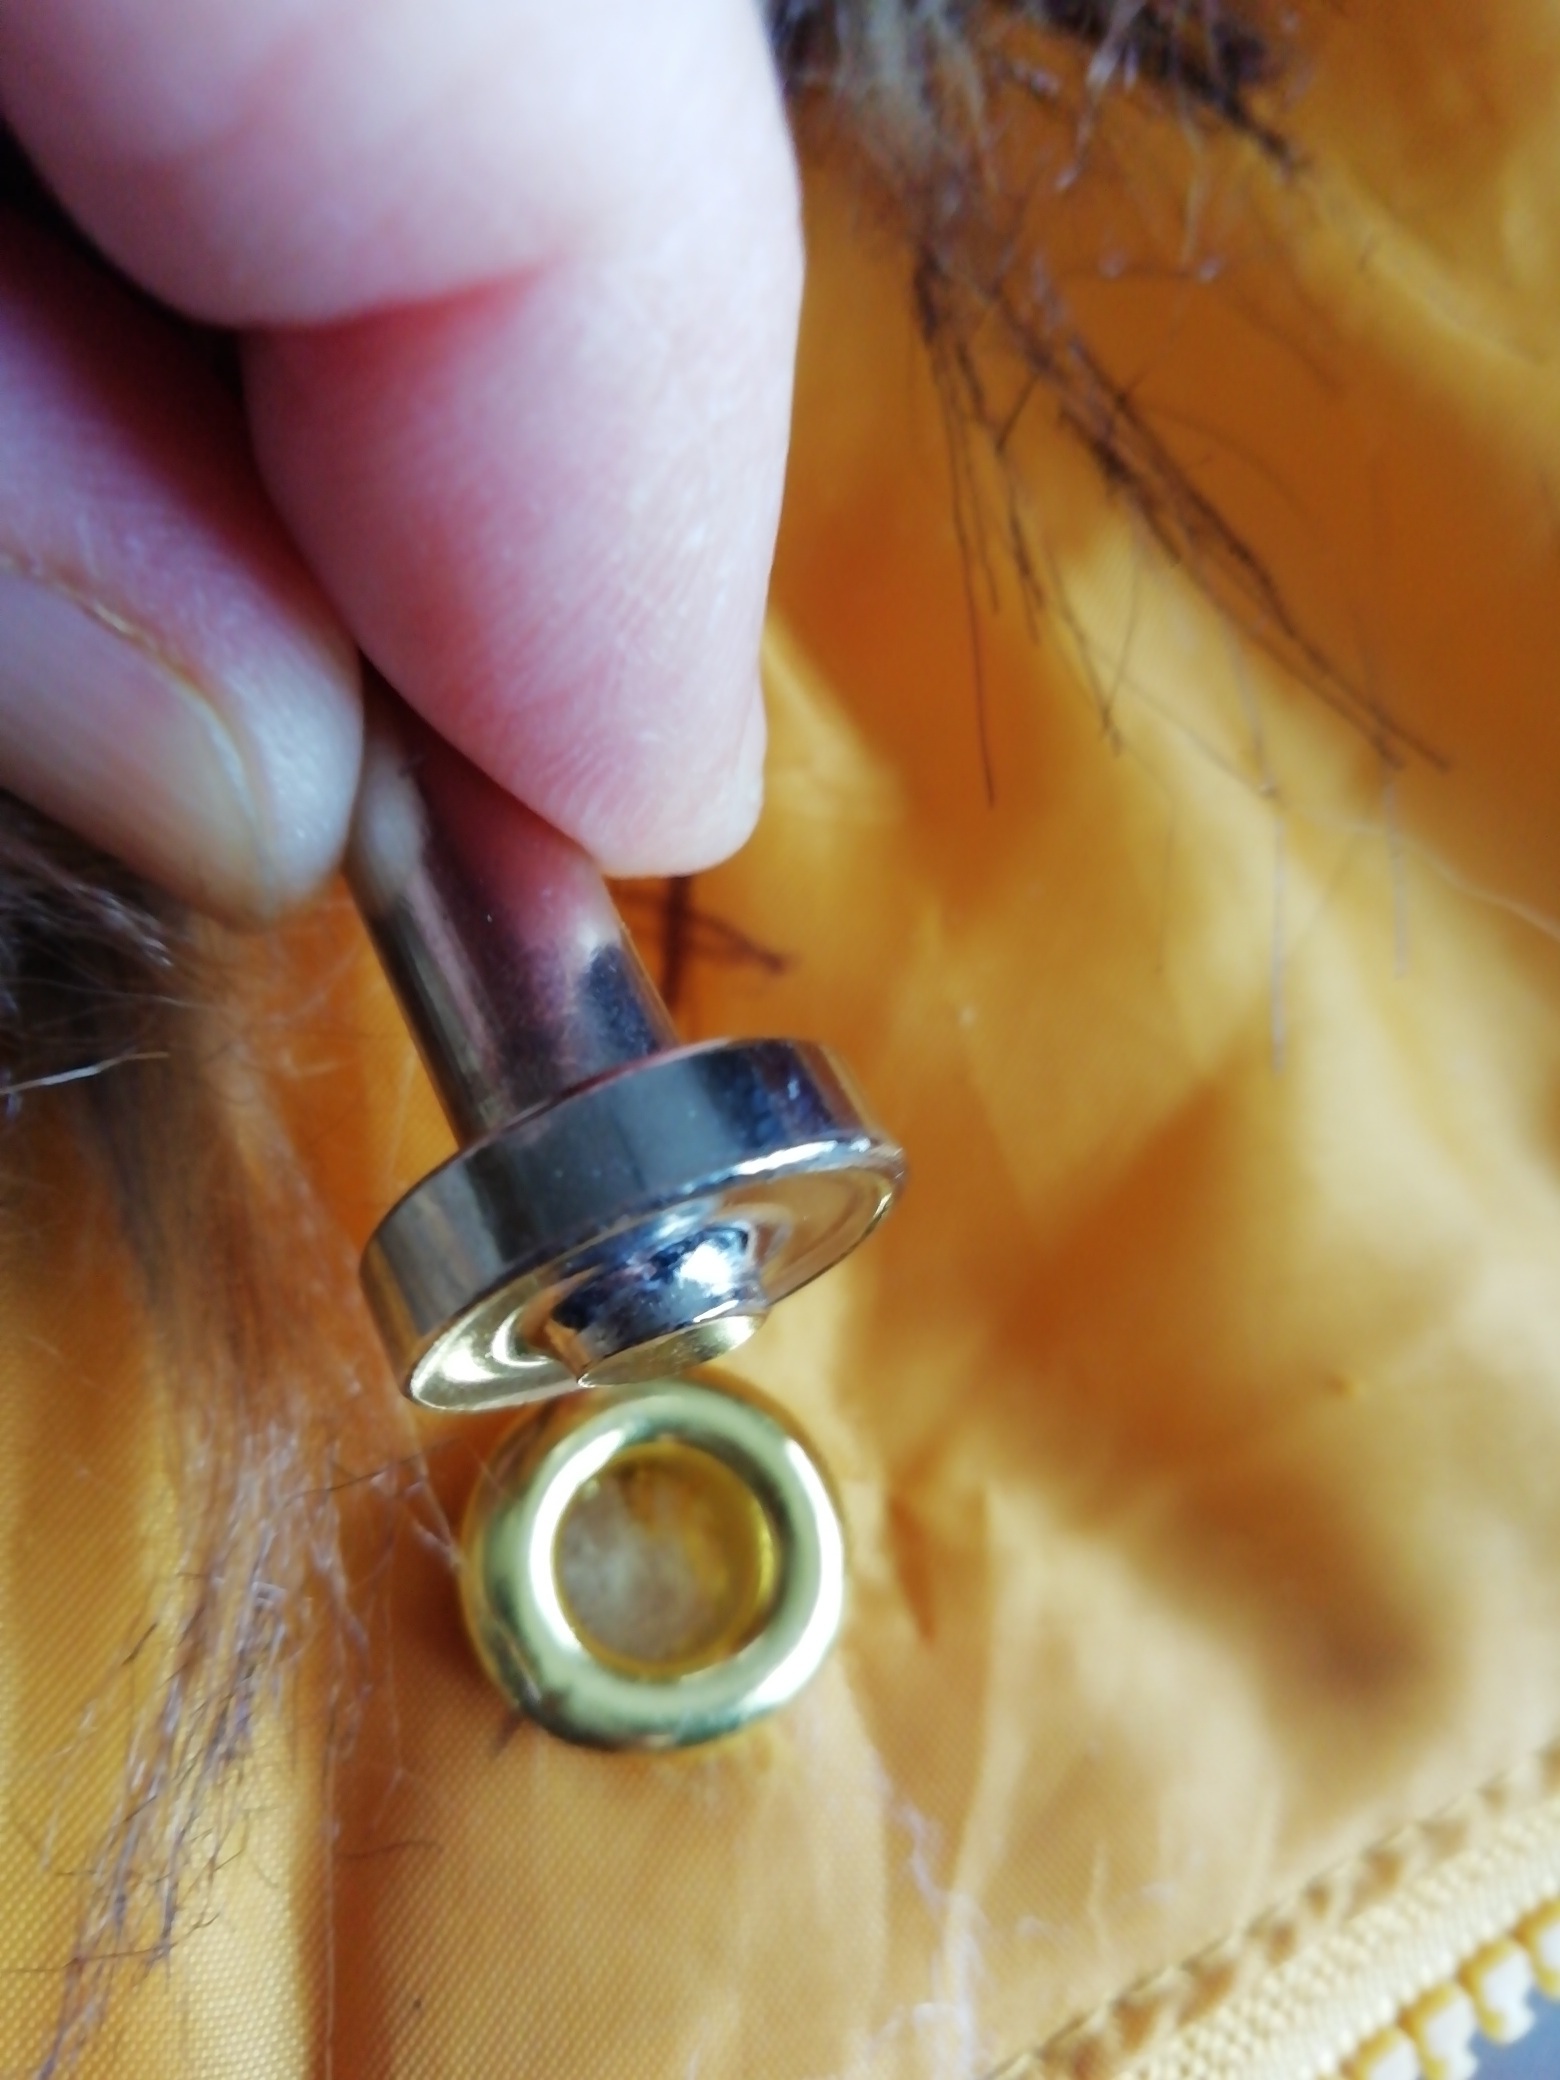
Step 6: Give it a Bash
It takes a bit of practice to find the right balance of power and precision. On one hand, you need to whack the setter hard enough that the prongs of the eyelet splay. This secures the halves of the eyelet together. On the other hand, if you strike too hard or your eyelet tool is off centre, you will ruin the eyelet and possibly your garment.
Protip: Hammer a few practice eyelets on a piece of similar fabric so that you can get your technique down.
Step 7: Sew a Line Along the Edge of Your Hood
Sew a line along the inside edge of your hood. You can use tailor chalk to mark it. This line will form the outer edge of the tube where you’ll insert the drawstring, so make sure that the string can go all the way through.
- Pass a wire through the tube to check for obstructions like fabric edges
- Also check that no seams intersect your tube
- If a seam cuts through your tube, use your seam ripper to unpick the offending stitches
Protip: In addition to matching your thread colour to the fabric, match the thread content. Synthetics with synthetics, cotton for natural fabrics.
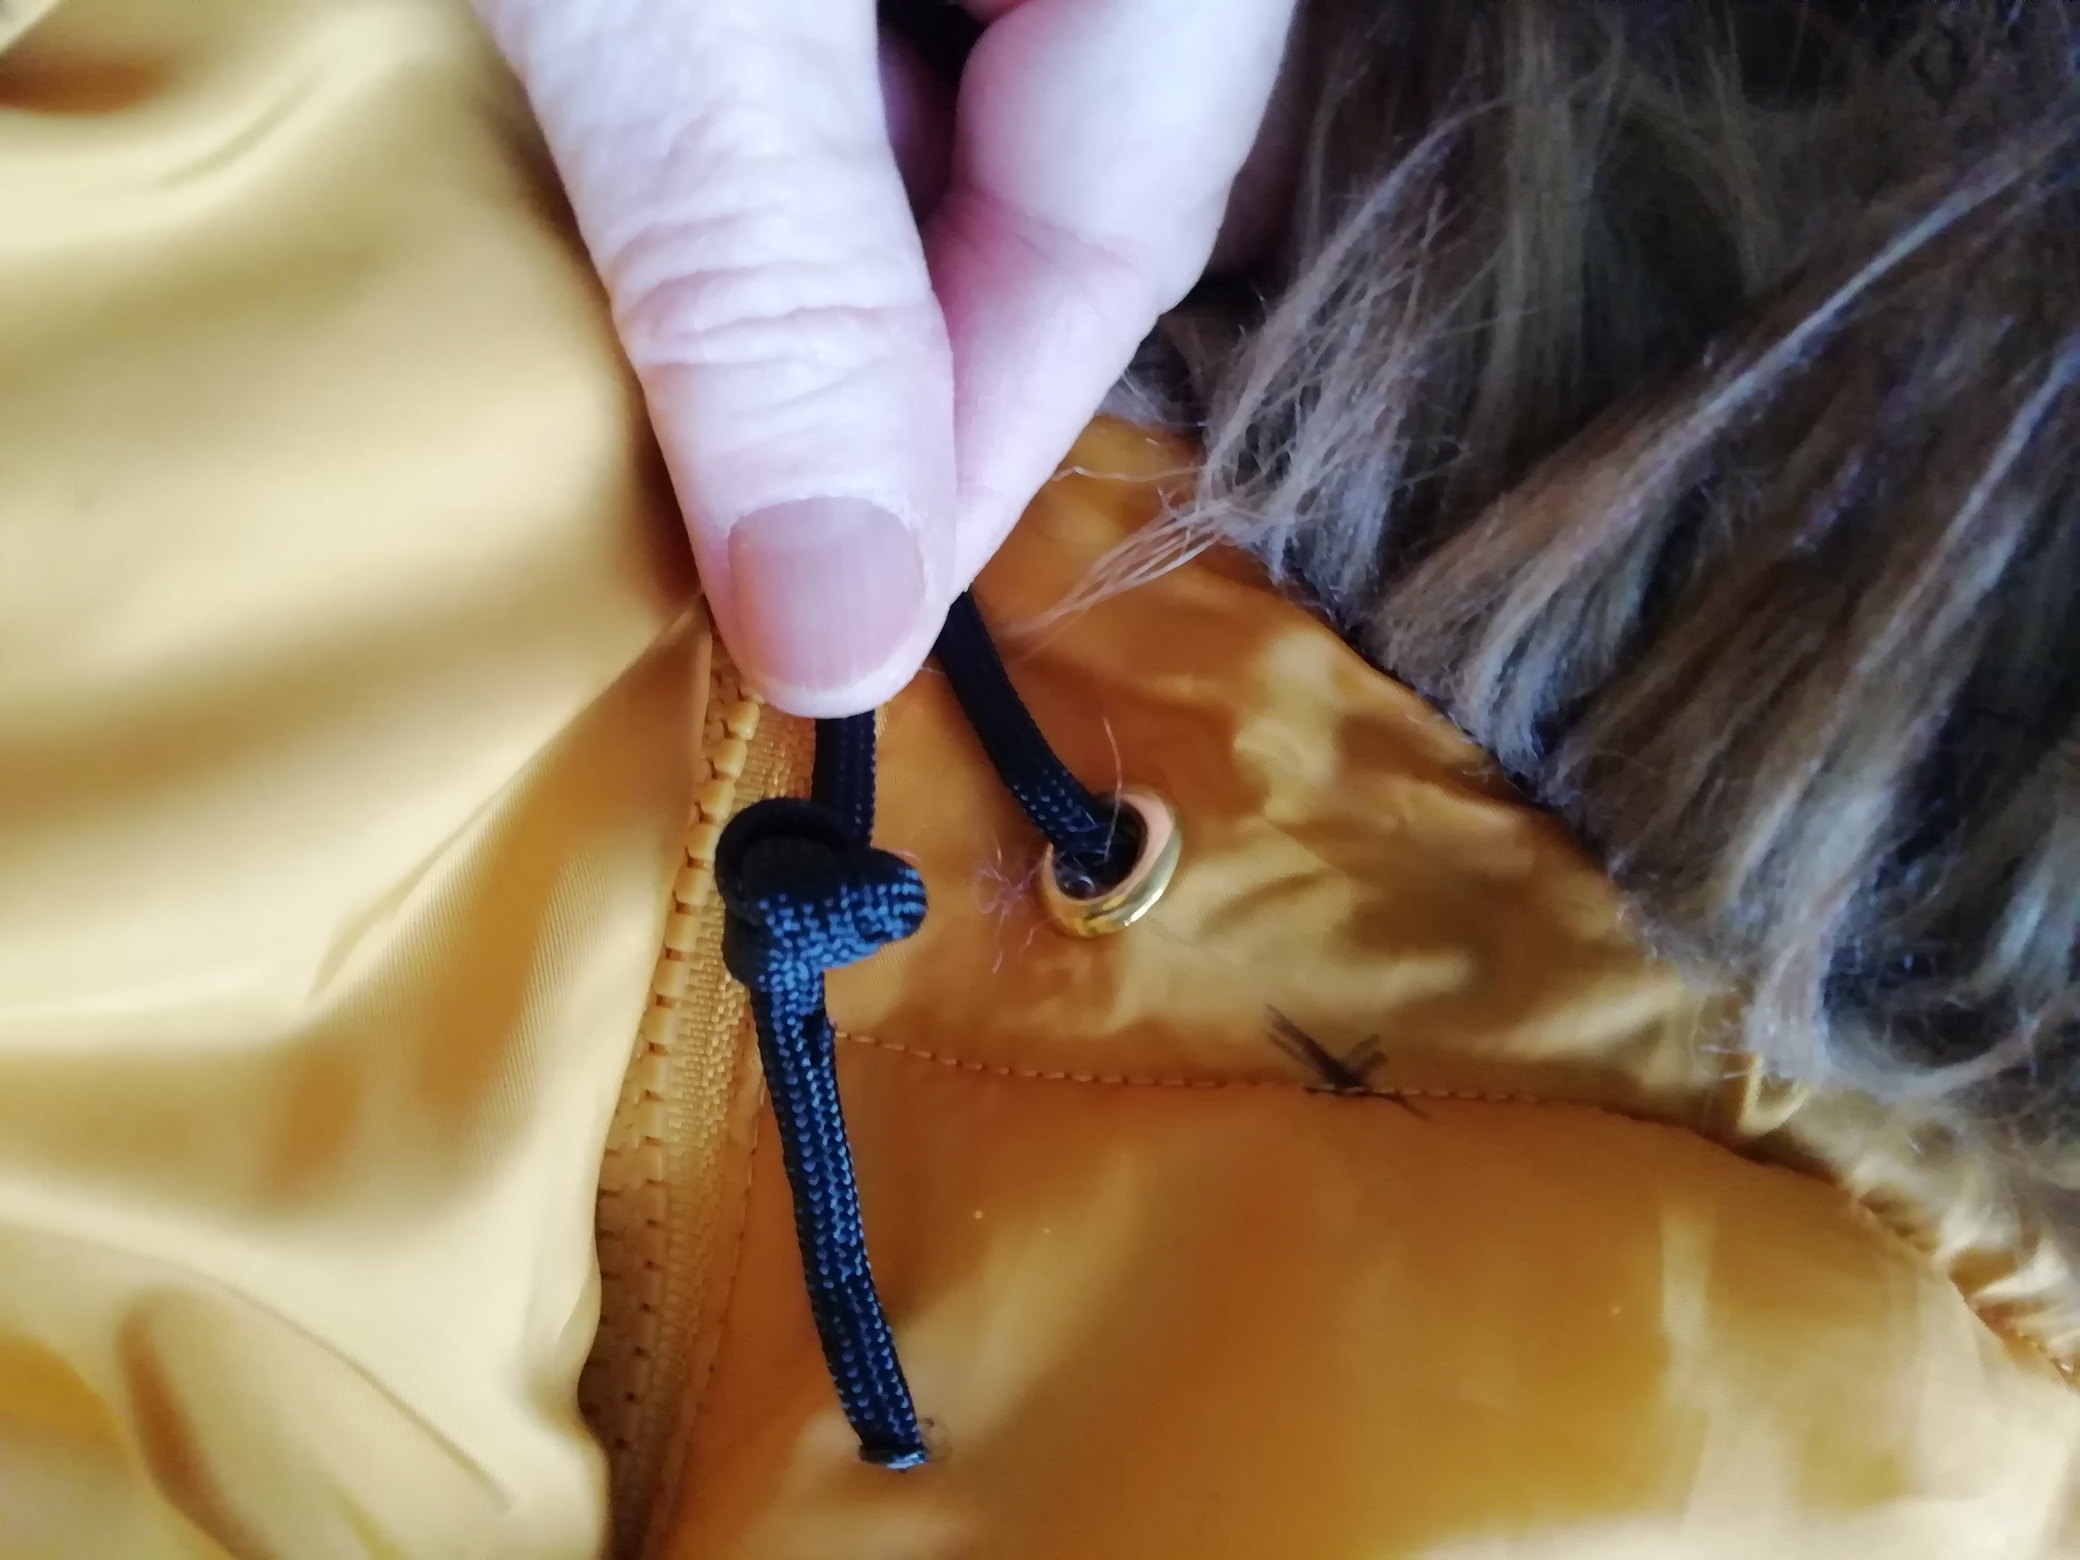
Step 8: Insert Your Drawstring
Drawstrings can be a real pain, especially when you’re putting one in a place not originally designed to hold it.
My favorite technique is to insert a wire into the drawstring and use the wire to push the drawstring where you need it to go.
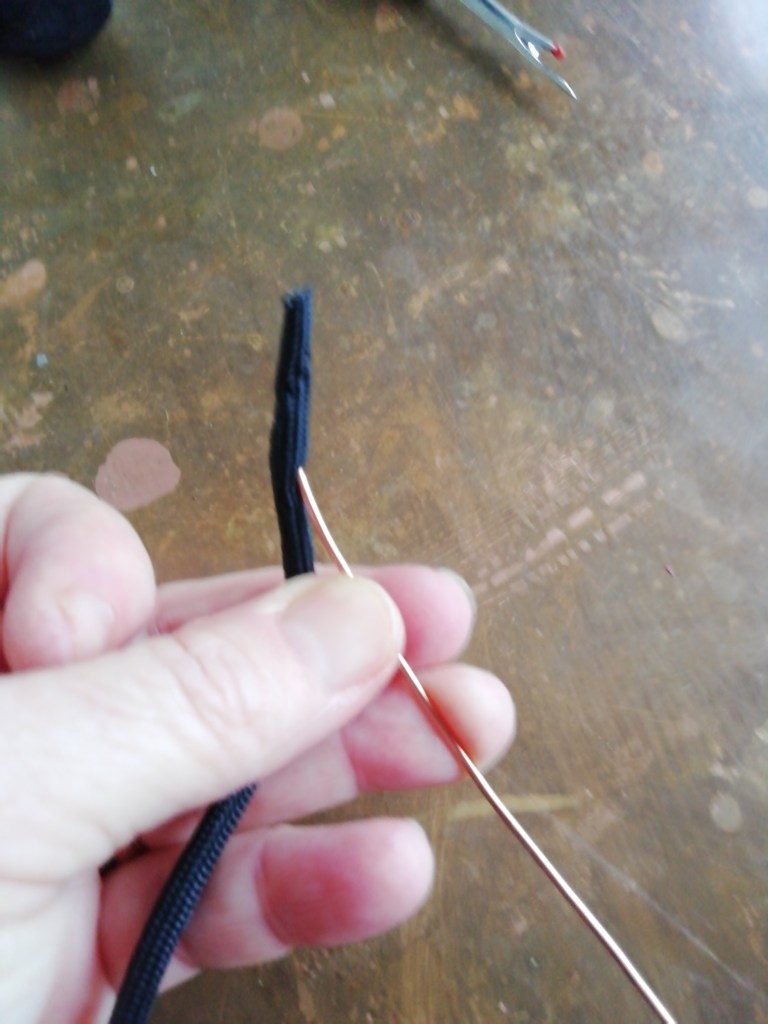
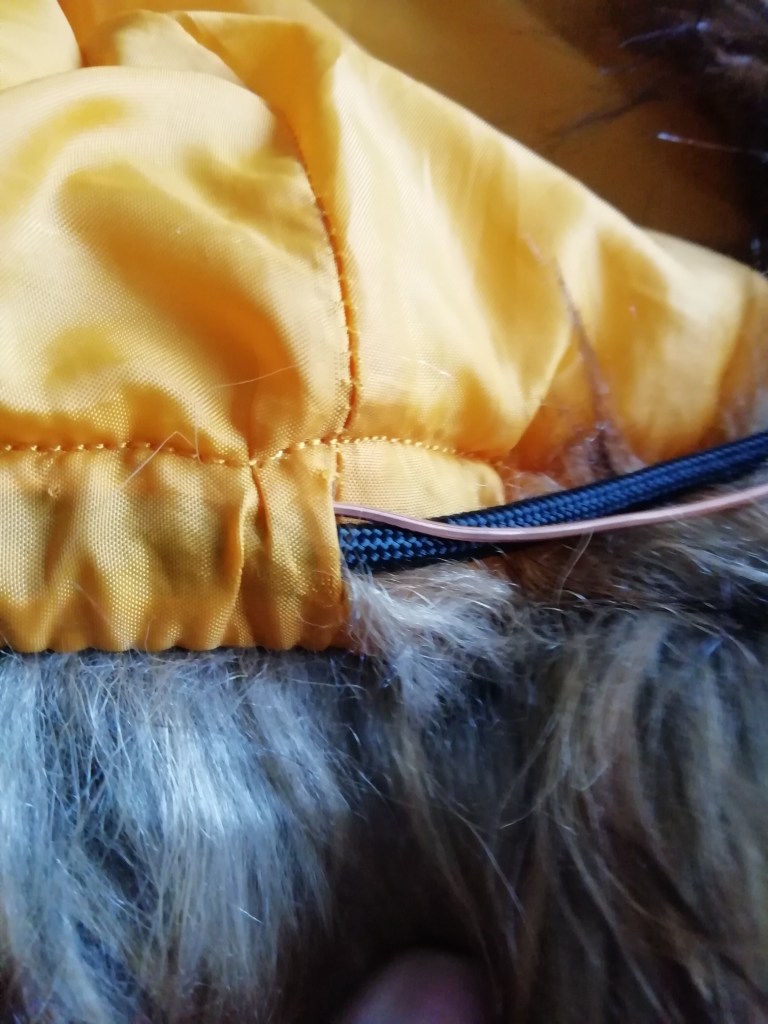
This may take several attempts.
Helpful hint: Be gentle with your eyelets!
Step 9: Knot off Your Drawstring
One of the only things worse than putting in a drawstring is having to put it in again because you accidentally pulled it out. So knot those ends good. If you’re feeling fancy, you can attach beads or buttons that are bigger than the eyelet. Alternately, if your string is made from synthetic material, you can use a gentle flame to melt the knot into place.
Step 10: Finishing Touches
This is the time to sew back any functional stitches that you’ve unpicked. You can do this by hand or with your machine
Ta Daaaaa!
Now my decorative hood looks good and works!

By the way, if you try this at home, and it works, I’d love to see pictures!
Just the Facts
If you just want the directions without all the chat, here you go. Thank you for playing!
The Task
To turn a “decorative” hood into a fully functioning yet still attractive hood.
Your Tools
- Two eyelets (four pieces)
- An eyelet tool
- A small hammer
- A length of cord or string equal to the task
- Your sewing machine
- A razor blade or seam ripper
- A pen, fabric pen, or tailor chalk
- A seam ripper
- And, of course, your hood
Decorative Hood Rescue: Step by Step
Here’s how to rescue your own decorative hood.
1. Make Your Mark
Helpful hint: attach your hood to the coat and find the natural place where the drawstrings should emerge. Make your mark on the inside of the hood.
2. Clear a Path
Carefully unpick a few stitches along the outside edge. Just enough to slip the eyelet beneath it.
3. Make a Hole
Using your seam ripper or the tips of your scissors, cut a small hole where you’ve made your mark for the drawstring. Only make the hole on the top layer of fabric!
4. Insert the First Half of the Eyelet
Slide the first half of your eyelet underneath the top layer of fabric. Bring the prongs up through the hole.
5. Insert the Second Half of the Eyelet
Set the second half of the eyelet atop the first.
6. Position the Eyelet Tool
7. Give it a Bash
Helpful hint: Do a few practice eyelets first. It can be difficult to tell how hard to hit it. You may have to hit it quite a few times to get that balance of securing the eyelet without deforming it.
8. Sew a Line Inside the Edge of the Hood
Sew a line about half an inch inside the outer edge of the hood. Your eyelets should fall between this line and the hood edge.
9. Draw the Drawstring Through
Push or pull the drawstring through. I find it helpful to push it along with a long section of wire.
10. Knot the Ends
Once your drawstring is where you want it, knot the ends. If you’re using a synthetic cord, you can melt the outside of the knot with a lighter. Alternately, you could tie beads on the ends.
11. Finishing Touches
Go back with a hand needle and re-sew the places that you unpicked before.
Did you find this tutorial helpful? Please feel free to share. And I’m always grateful for a linkback!

Leave a comment